最近関わっている案件で、モバイルアプリへのPUSH通知を必要とする気配があります。このPUSH通知は、特定タイミングで、特定の条件を満たすユーザに対して通知しなければなりません。
モバイルアプリや通知に関しては赤子のような知識しかなかったので、色々と試しながら学んでいました。 ようやくAmazon Pinpointを使って自分のiPhoneにリモート通知ができるようになったので、これまでの学んだ内容や苦労の結果を記述できる状態になりました。
- 通知の種類
- リモート通知のアーキテクチャ
- APNsへの端末登録とデバイストークンの取得
- Amazon Pinpoint
- Pinpointを含めた配信基盤の構築
- モバイルアプリへのAmazon Pinpointへのインテグレーション
- 実際のキャンペーン設定
- ハマったところ
通知の種類
ApplenのドキュメントUser Notificationsには、通知には以下の2種類があると規定されています。
- ローカル通知(local notification)
- ネイティブアプリ自身が通知内容や通知トリガー(時刻や場所等)設定する
- リモート通知(remote notification)
- アプリのバックエンドサーバが通知内容を生成の上でAPNs (Apple Push Notification service)へ送り、APNsからユーザのデバイスへ配信する
今回の要件はローカル通知で実現できるのではないかという思いはあるものの、まずはリモート通知から試してみました。
リモート通知のアーキテクチャ
リモート通知のアーキテクチャを簡単に書くと以下のように表されます。
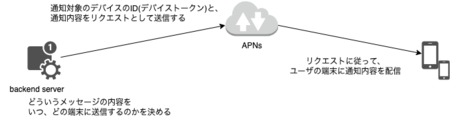
サーバは直接ユーザの端末に配信できる訳ではなく、iOSの場合はAPNsを経由しての配信になります。 バックエンドサーバはデバイスを特定するID(デバイストークン)を持ち、そのデバイストークンと通知内容をもとにAPNsへ配信を依頼します。 APNsはデバイストークンと端末情報のマッピングを保持しており、依頼をもとに配信をする仕組みです。
端末に通知するには端末の情報や場所といった情報も必要でしょうから、それを個々のサービス提供者へ開示しないようにする配慮なのでしょう。
APNsへの端末登録とデバイストークンの取得
前述の通り、リモート通知の前提は以下になります。
- APNsに端末情報が登録されていること
- バックエンドサーバが、端末情報とマッピングされるデバイストークンを保持していること
APNsの場合、この流れはRegistering Your App with APNsに記述されています。
ここで行わなければならないことは、以下の2つです。
- モバイルアプリに対して、Push Notificationsを有効化すること
- モバイルアプリの実装上で、アプリの起動毎にデバイストークンを取得すること
Push Notificationsの有効化は、Xcodeから実施できます。Xcode 14の場合は、「Signing & Capabilities」から「+ Capabilities」から選択できます。
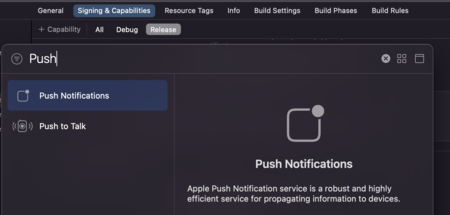
ただし、Push Notificationを選択するためには、Apple Developer Programへの加入が必要です。このアカウントをXcodeに登録しておかないと、Push Notificationsは選択肢に現れませんでした。
デバイストークン取得については以下のような実装になるでしょうか。 僕は今回初めてSwiftに触ったので、マジで自信がないですが…。
    func application(_ application: UIApplication, didFinishLaunchingWithOptions launchOptions: [UIApplication.LaunchOptionsKey : Any]? = nil) -> Bool {
        // snip

        // 通知設定の許可をユーザに要求する
        let center = UNUserNotificationCenter.current();
        center.requestAuthorization(options: [.alert, .sound, .badge]){
            (granted, _) in
            if granted {
                // ユーザが通知を許可した場合
                DispatchQueue.main.sync {
                    application.registerForRemoteNotifications();
                }
            }
            else {
                // ユーザが通知を拒否した場合
                print("通知を拒否設定されました")
            }
        }

        // snip
        return true;
    }
Amazon Pinpoint
ところでAWSを前提とした時にモバイルアプリへPUSH通知するサービスの選択肢は以下の2つでしょう。
今回僕はAmazon Pinpointを選択しました。Amazon Pinpointのメリットとして感じたのは以下の通りです。
- KVSと同様のイメージで、端末の情報を管理できる
- 端末の機種、場所、アプリで定義する属性やメトリクスを「エンドポイント」という概念のもとで管理できる
- ユーザ単位で「エンドポイント」の情報を同期できる
- 複数端末を持つユーザの場合、当該ユーザの「エンドポイント」が複数になるが、ユーザの情報はエンドポイント間で自動的に同期される
- 「ユーザ」の概念はCognitoと連携できる
- エンドポイントの情報をもとにして、どのような条件を満たすユーザ/端末に配信するかという「セグメント」を定義できる
- 配信タイミング・対象セグメント等を「キャンペーン」という概念で定義できる
- 自動的に、どのユーザがどれだけアプリを利用しているかという情報を収集・分析できる
- PUSH通知に留まらず、メールやSMSをサポートした、統合的な配信・エンゲージメントトラックの基盤になっている
Pinpointは内部でSNSを利用している気配はあるので、SNSを利用したより上位のサービスと言えるでしょう。
Pinpointを含めた配信基盤の構築
本来はTerraformで構築したいのですが、はまりどころが多そうなので、まずはネット上にノウハウが多くあるAmplifyで構築しました。
以下のようにすれば、Amazon Pinpointや、連携するCognitoのIDプール等が構築できます。
$ npx amplify init
$ npx amplify add analytics
? Select an Analytics provider Amazon Pinpoint
? Provide your pinpoint resource name: pushnotification
Adding analytics would add the Auth category to the project if not already added.
? Apps need authorization to send analytics events. Do you want to allow guests and unauthenticated users to send analytics events? (we recommend you allow this when getting started) Yes
✅ Successfully added auth resource locally.
Successfully added resource pushnotification locally
$ npx amplify push
✔ Successfully pulled backend environment dev from the cloud.

    Current Environment: dev

┌───────────┬──────────────────┬───────────┬───────────────────┐
│ Category  │ Resource name    │ Operation │ Provider plugin   │
├───────────┼──────────────────┼───────────┼───────────────────┤
│ Auth      │ pushnotification │ Create    │ awscloudformation │
├───────────┼──────────────────┼───────────┼───────────────────┤
│ Analytics │ pushnotification │ Create    │ awscloudformation │
└───────────┴──────────────────┴───────────┴───────────────────┘
? Are you sure you want to continue? Yes

Deployment completed.
あとはAPNsとの通知設定を行います。APNsからみると、「正しいアプリから送られてくる配信依頼」かを確認する必要があり、バックエンドサーバの認証が必要です。 この認証に関しては、以下の2種類が用意されています。
- トークンベース
- 証明書ベース
証明書ベースだと証明書の更新が必要になることもあり、今回はトークンベースを選択しました。 トークンベースの場合、必要になるのは以下の情報です。
- アプリのバンドルID
- Apple Developer Program上で定義されるチームID
- トークンのキー
- トークン (.p8ファイル)
いずれも、Apple Developer Programのポータルで確認・ダウンロードが可能です。
これらの情報が揃ったら、AmplifyでAPNsの設定を入れていきます。
$ npx amplify add notifications
? Choose the push notification channel to enable. APNS
? Choose authentication method used for APNs Key
? The bundle id used for APNs Tokens:  hoge
? The team id used for APNs Tokens:  xxxx
? The key id used for APNs Tokens:  xxxx
? The key file path (.p8):  xxx.p8
✔ The APNS channel has been successfully enabled.
$ npx amplify status

    Current Environment: dev

┌───────────────┬──────────────────┬───────────┬───────────────────┐
│ Category      │ Resource name    │ Operation │ Provider plugin   │
├───────────────┼──────────────────┼───────────┼───────────────────┤
│ Auth          │ pushnotification │ No Change │ awscloudformation │
├───────────────┼──────────────────┼───────────┼───────────────────┤
│ Analytics     │ pushnotification │ No Change │ awscloudformation │
├───────────────┼──────────────────┼───────────┼───────────────────┤
│ Notifications │ pushnotification │ No Change │                   │
└───────────────┴──────────────────┴───────────┴───────────────────┘
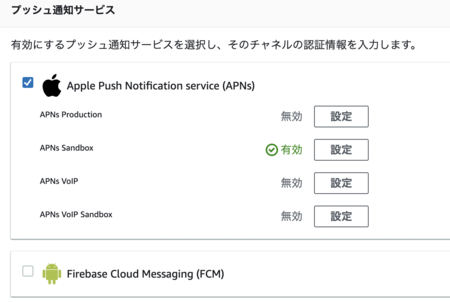
これを行うと、以下のようにPinpoint上でAPNs ProductionとAPNs Sandboxが有効化されます。 (画面上はAPNs Productionが無効化されていますが、これはマネジメントコンソールから手動で無効化しました)
モバイルアプリへのAmazon Pinpointへのインテグレーション
前述した通り、Amazon Pinpointは「エンドポイント」という概念でユーザの端末を管理します。 従って、アプリ実装上で、この「エンドポイント」を作成しにいく必要があります。
この辺りのSDKにはaws-sdk-ios-spmを利用しました。
エンドポイントの作成は以下のように行います。 話をシンプルにするため、私はデバイストークンを取得したタイミングで呼び出されるコールバックに仕込みました。
    func application(_ application: UIApplication, didRegisterForRemoteNotificationsWithDeviceToken deviceToken: Data) {

        let tokenParts = deviceToken.map { data in String(format: "%02.2hhx", data) }
        let token = tokenParts.joined()
        print("Device Token: \(token)")

        if let targetClient = pinpoint?.targetingClient {
            // エンドポイントに対して、属性やメトリクスを設定する
            targetClient.addAttribute(["pondelion"], forKey: "likes")
            targetClient.addMetric(1, forKey: "tired")

            let endpoint = targetClient.currentEndpointProfile()

            // エンドポイントに対してユーザー情報を紐付ける
            let user = AWSPinpointEndpointProfileUser()
            user.userId = "kiririmode"
            user.addAttribute(["lion"], forKey: "animal")
            endpoint.user = user
            endpoint.optOut = "NONE"

            // エンドポイントを更新
            targetClient.update(endpoint)
            targetClient.updateEndpointProfile()
            print("Updated custom attribute for endpoint \(endpoint.endpointId)")
            pinpoint?.notificationManager.interceptDidRegisterForRemoteNotifications(withDeviceToken: deviceToken)
        }
    }
これを行うと、エンドポイントIDが払い出されます。 実際に内容を見ると、コード中に指定した属性やメトリクスが管理されていることがわかります。
$ aws pinpoint get-endpoint --application-id xxxxxxx --endpoint-id yyyyyy
{
    "EndpointResponse": {
        "Address": "aaaaaa",
        "ApplicationId": "xxxxxxx",
        "Attributes": {
            "likes": [
                "pondelion"
            ]
        },
        "ChannelType": "APNS_SANDBOX",
        "CohortId": "58",
        "CreationDate": "2022-10-01T04:34:53.879Z",
        "Demographic": {
            "AppVersion": "1.0",
            "Locale": "en_JP",
            "Make": "apple",
            "Model": "iPhone",
            "Platform": "ios",
            "PlatformVersion": "16.0",
            "Timezone": "Asia/Tokyo"
        },
        "EffectiveDate": "2022-10-01T05:04:45.918Z",
        "EndpointStatus": "ACTIVE",
        "Id": "yyyyyy",
        "Location": {
            "Country": "JP"
        },
        "Metrics": {
            "tired": 1.0
        },
        "OptOut": "NONE",
        "RequestId": "zzzz",
        "User": {
            "UserAttributes": {
                "animal": [
                    "lion"
                ]
            },
            "UserId": "kiririmode"
        }
    }
}
実際のキャンペーン設定
それでは実際のキャンペーンを設定し、リモート通知を配信してみましょう。
今回はAWSのマネジメントコンソールからキャンペーンを作成しますが、これらはもちろんコードでも作成できます。
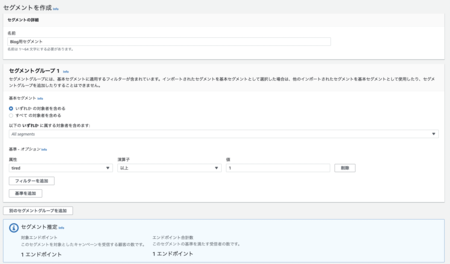
まずはセグメントを作成します。ここではtiredという属性が1.0以上という形で条件づけていますが機種やOSバージョン、年齢層等、さまざまな基準でセグメントを切れます。
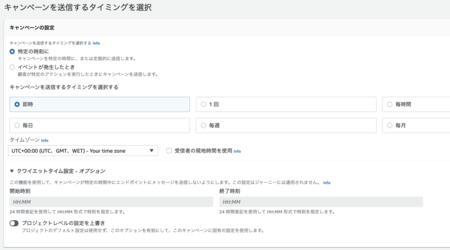
配信タイミング設定は以下のような形です。即時配信や時刻指定の配信、定期配信設定も可能です。 細かいなと感じたのは、「夜間は配信しない」といったクワイエットタイムも設定可能なところですね。大量配信する場合は配信完了までに時間がかかるでしょうから、便利な設定ですね。
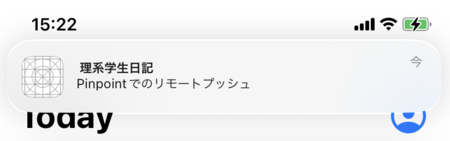
このキャンペーンを起動すると、自作アプリを入れた自分のiPhoneにリモートプッシュが配信されました。
ハマったところ
APNs ProductionとAPNs Sandboxの使い分けはガッツリとハマりました。
当たり前ですが、APNsではProductionとSandboxとでデバイストークンを別管理しています。つまり、Sandboxで払い出したデバイストークンはSandboxでしか使えません。
SandboxのデバイストークンをProductionで使おうとすると、BadDeviceTokenというエラーが発生します。
AWS
この使い分けに関してですが、Amplify/PinpointではAWSPinpointConfigurationのdebugAWSPinpointConfiguration(py)debug)で指定します。
これをtrueにすると、APNS Sandboxを利用する前提でPinpointが使われるようになります。
Setting this flag to true will set the Endpoint Profile to have a channel type of “APNS_SANDBOX”.
Pinpointのエンドポイントレベルでは、どちらのAPNsを使うのかは抽象化されており、意識しなくてもよさそうです。
$ aws pinpoint get-endpoint --application-id xxxx --endpoint-id yyyy | jq -r .EndpointResponse.ChannelType
APNS_SANDBOX
Xcode
Xcode側では、APNs Sandboxを使うのかProductionを使うのかを、プロビジョニングプロファイルで切り替えるようです。私はその辺り全然調べてないので、それが事実なのかどうかは確認していません。
なお、Entitlementの方でも切り替えられそうな記述があります。
This key specifies whether to use the development or production Apple Push Notification service (APNs) environment when registering for push notifications with registerForRemoteNotifications().